

Preparing your data for machine learning is not a task that most AI professionals miss. Data are of different quality, most often they require very thorough analysis, sometimes manual review, and certainly selection and initial preprocessing. In the case of classification tasks, the division of a dataset into classes may be inappropriate or insufficiently balanced. Often, a dataset is also simply too small and have to be artificially augmented. To sum up: it is not easy.
Nevertheless, it is a necessary step, and often more important one than the subsequent tuning of the training algorithm. Part of the data manipulation stage is serving them from a previously prepared dataset, most often in batches, to the training algorithm. In this post I would like to take a closer look at some methods of data manipulation that are offered by the PyTorch library.
In this post you will learn:
- How to prepare the conda environment to work with PyTorch?
- What are the Dataset and DataLoader classes for?
- How to use them to work with one of the predefined datasets provided by the PyTorch library?
- How to use Dataset and DataLoader to import your own dataset?
- How to deal with a dataset consisting of multiple files, such as image files?
But first, let’s prepare an environment…
Below I enclose a short instruction on how to prepare the environment for PyTorch. This makes it easier to recreate the code presented below. Of course, if you already have the environment ready, you can skip this part of the post.
I use conda and in my local environment I do not have a CUDA compatible card, so I need a build for the CPU. At the beginning, it is always worth checking the current version of conda:
> conda -V> conda update -n base -c defaults conda
Then we create the environment for our work, activate it and install the necessary packages. Note the cpuonly – if you have CUDA, the installation should not include this parameter. The -c pytorch parameter may also be important, indicating the dedicated channel that will contain the appropriate versions of PyTorch and torchvision.
> conda create --name pytorch_env> conda activate my_env> conda install jupyter pytorch torchvision numpy matplotlib cpuonly -c pytorch
Finally, we go to the working directory where we intend to save the scripts, run Jupyter Notebook and perform a simple test.
> cd <<my working directory>>> jupyter notebook
import torchx = torch.rand(5, 3)print(x)>>> tensor([[0.3425, 0.0880, 0.5301], [0.5414, 0.2990, 0.5740], [0.3530, 0.0147, 0.5289], [0.2170, 0.3744, 0.7805], [0.6985, 0.5344, 0.7144]])
If you encounter any problems while doing the above, do not have Anaconda installed, or want to use CUDA, please refer to this manual.
Data preparation – the simplest scenario.
PyTorch offers two classes for data processing: torch.utils.data.Dataset and torch.utils.data.DataLoader. To simplify somewhat, Dataset‘s task is to retrieve a single data point together with its label from a dataset, while DataLoader wraps the data retrieved by Dataset with an iterator, ensures that it is served in batches, runs in multiple threads to speed up the retrieval of data for training if necessary, and supports such operations as data shuffling.
PyTorch also provides many sample datasets you can easily use in your learning time. So let’s start with such a scenario and prepare the data for training for the already known MNIST dataset. Below, we import the torch library, the Dataset class and the torchvision.datasets package containing many sample datasets from the computer vision space. Each dataset in the torchvision.datasets is a subclass of Dataset, which means that the __getitem__ and __len__ methods are implemented for us, more on that later.
import torchfrom torch.utils.data import Datasetfrom torchvision import datasets
When we import data from any dataset, we most often need to transform it in some way (e.g. normalize). The torchvision package, as well as other packages with sample datasets available in PyTorch, have defined transforms that are available in the transforms package. In our example, we will use one of them that converts the data taken from the dataset to the PyTorch tensor.
from torchvision.transforms import ToTensorimport matplotlib.pyplot as plt
The dataset download is very simple: we create a class object of a given dataset (in our example MNIST) by passing a few parameters. Here: the local directory to which the data will be downloaded, indication whether we download the test or the training subset, transforms we want to apply – and we can provide several of them – and the flag telling if we want to download dataset to a disk, so that you do not have to download it every time you execute this instruction.
training_dataset = datasets.MNIST(root='mnistdata', train=True, transform=ToTensor(), download=True)
Further use of the dataset boils down to calling an object that will return a pair (tuple) – data and label:
image, label = training_dataset[100]print(type(image))print(image.size())print(type(label))
>>> <class 'torch.Tensor'>>>> torch.Size([1, 28, 28])>>> <class 'int'>
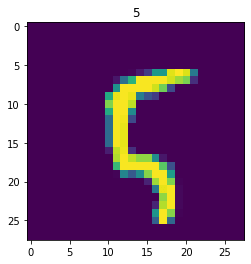
We can display the retrieved image:
plt.imshow(image.squeeze())plt.title(label)plt.show()
Enters DataLoader. We use the created Dataset class object to wrap it up with additional functions useful for machine learning:
from torch.utils.data import DataLoaderdataloader = DataLoader( dataset=training_dataset, batch_size=5)
After the DataLoader object was created, we can freely iterate, and each iteration will provide us with the appropriate amount of data – in our case, a batch of 5:
images, labels = next(iter(dataloader))print(type(images), type(labels))print(images.size(), labels.size())
>>> <class 'torch.Tensor'> <class 'torch.Tensor'>>>> torch.Size([5, 1, 28, 28]) torch.Size([5])
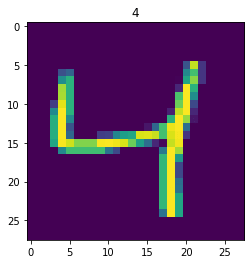
Let’s assume that we want to display the content of the second image in the batch:
idx = 2label = labels[idx].item()image = images[idx]plt.imshow(image.squeeze())plt.title(label)plt.show()
Now, we may use such data structures in the training process. We will discuss how to do this in another post, and now let’s see how we can use Datasets and DataLoaders in more practical scenarios.
How to create your own Dataset?
More practical would be for example to use your own dataset, not a sample dataset embedded in the PyTorch package. For simplicity, let’s assume that our dataset will be 500 readings of 10 integers, along with their classification into 10 classes, marked with numbers from 0 to 9.
The first step in the process of preparing your own dataset is to define our own class, which inherits from the “abstract” Dataset class. The implementation is simple because such a class requires only two methods to be overwritten: __getitem__ and __len__. Plus of course you should provide the code for the method that initializes the object (__init__). Since our dataset will be randomly generated, the constructor will accept 4 parameters: the beginning and the end of the integer interval for the number generator and the size of the dataset, here 500 rows with 10 values each. We also initialize labels in the constructor – randomly as well:
import torchfrom torch.utils.data import Dataset, DataLoader
class RandomIntDataset(Dataset): def __init__(self, start, stop, x, y): # we randomly generate an array of ints that will act as data self.data = torch.randint(start, stop, (x,y)) # we randomly generate a vector of ints that act as labels self.labels = torch.randint(0, 10, (x,))
def __len__(self): # the size of the set is equal to the length of the vector return len(self.labels)
def __str__(self): # we combine both data structures to present them in the form of a single table return str(torch.cat((self.data, self.labels.unsqueeze(1)), 1))
def __getitem__(self, i): # the method returns a pair: given - label for the index number i return self.data[i], self.labels[i]
In the next step, we create an object of the RandomIntDataset class by providing the appropriate parameters and we check the size of the generated dateset:
dataset = RandomIntDataset(100, 1000, 500, 10)len(dataset)>>> 500
Let’s see what our newly created dataset looks like – the last column shows the class of a single data sample:
print(dataset)>>> tensor([[627, 160, 881, ..., 485, 457, 9], [705, 511, 947, ..., 744, 465, 5], [692, 427, 701, ..., 639, 378, 9], ..., [601, 228, 749, ..., 155, 823, 4], [599, 627, 802, ..., 179, 693, 4], [740, 861, 697, ..., 286, 160, 4]])
After we have created the object, we may use it by surrounding it, as in the previous example, with a DataLoader, and then iterate over the batches of data – in our case, 4-element ones.
dataset_loader = DataLoader(dataset, batch_size=4, shuffle=True)data, labels = next(iter(dataset_loader))data>>> tensor([[724, 232, 501, 555, 369, 142, 504, 226, 849, 924], [170, 510, 711, 502, 641, 458, 378, 927, 324, 701], [838, 482, 299, 379, 181, 394, 473, 739, 888, 265], [945, 421, 983, 531, 237, 106, 261, 399, 161, 459]])labels>>> tensor([3, 6, 9, 7])
Retrieving data from files
In computer vision tasks, we often deal with data that are provided as files. Inheriting from the Dataset abstract class and overwriting its methods will allow us to process such files exactly the same way:
- create a class inheriting from Dataset,
- define __init__, __getitem__ and __len__ methods, plus any other helper methods, if necessary,
- create an object of this class and pass it to the DataLoader.
Now let’s look at how you can implement data retrieval for the Facial Key Point Detection Dataset. After downloading and unpacking the file, we will get the images directory containing 5000 files, cut to the same size, and a json file containing the coordinates of 68 key face points for each of the files. These key points usually identify the eyes, lip line, eyebrows, and the oval of a face.
The dataset was prepared by Prashant Arora as a subset of the original, much larger Flickr-Faces-HQ dataset, created by the NVIDIA team and made available under the Creative Commons BY-NC-SA 4.0 license.
We import the necessary libraries and create the class inheriting from Dataset, in which we implement the three required methods. The __init__ method sets a variable pointing to the name of the data directory. It should be in the directory from which we run this script. We should unpack the downloaded file to this data directory. The __len__ method returns the size of the variable with the coordinates of key points, which happens to be also the size of the entire dataset. The __getitem__ method first gets the name of the file with index i from the variable with coordinates, and then loads the image from the appropriate file located in the images directory.
import torchfrom torch.utils.data import Dataset, DataLoaderimport json # we need to import json file with key points coordinatesimport numpy as npimport matplotlib.image as imgimport matplotlib.pyplot as plt
class FacialDetection(Dataset): def __init__(self, dataset_directory="FacialKeyPoint"): # set root directory for your dataset self.dataset_directory = dataset_directory
# read json file with annotations annotations_file = open(self.dataset_directory + "\\all_data.json") self.annotations = json.load(annotations_file)
def __len__(self): return len(self.annotations)
def __getitem__(self, i): image_filename = self.annotations[str(i)]['file_name'] image_path = self.dataset_directory + "\\images\\" + image_filename image = img.imread(image_path)
points = self.annotations[str(i)]['face_landmarks']
return image, np.array(points)
We can now create an object of our new class and check if we really have a set of 5000 elements:
dataset = FacialDetection()len(dataset)>>> 5000
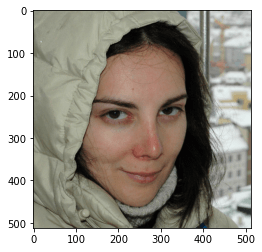
Let’s retrieve one of the images, with the index of 888 and display the content:
image, key_points = dataset.__getitem__(888)plt.imshow(image)plt.show()
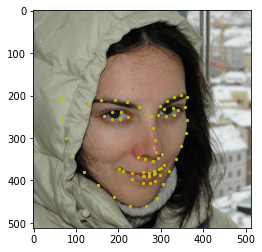
And the same picture with key points applied:
plt.imshow(image)plt.scatter(key_points[:, 0], key_points[:, 1], marker='o', c='y', s=5)plt.show()
If you want to serve this file for machine learning, just wrap it with the DataLoader class and iterate over the returned object.
dataset_loader = DataLoader(dataset, batch_size=4, shuffle=True)data, labels = next(iter(dataset_loader))data.size()>>> torch.Size([4, 512, 512, 3])
labels.size()>>> torch.Size([4, 68, 2])
Time for a short summary
The Dataset and DataLoader classes offer a simple and, what’s very important, standardized way of accessing data and its further processing in machine learning. Apart from the very fact of standardization (which greatly simplifies programming in many applications), these classes are also used for easy access to datasets available in the PyTorch library. Importantly, torchvision, torchtext and torchaudio allow you to use predefined transforms (here an example for the torchvision) and use them in the DataLoader. You can also use these transforms in your own class or write your transforms – I did not mention this topic in the post, but it is worth mentioning as an additional advantage. Yet another benefit of using Dataset and DataLoader is a possibility to parameterize parallel processing on many CPUs, or on the GPU as well as to optimize data transfer between the CPU and GPU, which is critical when processing very large amounts of data.